A tweet by Michael Hutchinson on C#/Mono usage in games caused me to do a couple of short replies (one, two). But then I started thinking a bit more, and here’s a longer post on what is needed for C# (and more specifically Mono) to be used in games more.
In Unity we use Mono to do game code (well, Unity users are doing that, not us). Overall it’s great; it has tons of advantages, loads of awesome and a flying ninja here and there. But no technology is perfect, right?
Edit: Miguel rightly points out in the comments that Mono team is solving or has already solved some of these issues already. In some areas they are moving so fast that we at Unity can’t keep up!
#1: Garbage Collector
Most game developers do not like Garbage Collection (GC) very much. Typically, the more limited/hardcore their target platform is, the more they dislike GC. The reason? Most GC implementations cause rather unpredictable spikes.
Here’s a run of something recorded in the (awesome) Unity 2.6 profiler. Horizontal axis is time, vertical is CPU time spent in that frame:
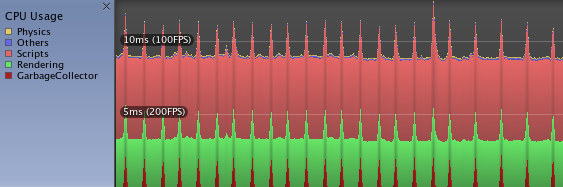
At the bottom you see dark red thingies appearing once in a while. This is garbage collector kicking in, because some script code is allocating some memory at runtime.
Now of course, it is possible to write your script code so that it does no allocations (or almost no allocations). Preallocate your objects into pools, manually invoke GC when there’s a game situation when a small hickup won’t affect gameplay, etc. In fact, a lot of iPhone games made with Unity do that.
But that kind of side steps the whole advantage of “garbage collector almost frees you from doing memory management”. If you’re not allocating anything anyway, GC could just as well not be there!
A little side story. Me and Unity’s iPhone tech lead ReJ tried to explain what GC is to a non-programmer. Here’s what we came up with:
Garbage Collection is this cleaning service for lazy people. They can just leave any garbage on the floor in their house, and once in a while a garbage guy comes, collects all the garbage and takes it outside. Now, there are some intricacies in the service.
First, you never know when the garbage guy will come. You might be taking a shower, doing a meditation or having some “sexy time” - and it’s in the service agreement that when a garbage guy comes, you have to let him in to do his work.
Second thing is, the garbage guy is usually some homeless drunkard. He smells so bad that when he comes, you have to stop whatever you were doing, go outside and wait until he’s done with the garbage collection. Even your neighbors, who might be doing something entirely else in parallel, actually have to stop and idle while garbage is being collected in your house!
There are variations of this GC service. One variation is called “moving GC”, where the garbage guy also rearranges your furniture while collecting the garbage - he moves it all into one side of your house. This is so that you can buy a bigger piece of furniture, or throw a huge piece of garbage - and there will be enough unused space for you to do that! Of course this way GC process takes somewhat longer, but hey, you get all your stuff nicely packed into one corner.
Can’t you see that this service is the greatest idea of all time?
This is quite a harsh attitude towards GC, and of course it’s exaggerated. But there is some truth to it. So how could GC be fixed?
GC fix #1: more control
More explicit control on when & how long GC runs. I want to say to the garbage guy, “come everyday at 4PM and do your work for 20 minutes”. In the game, I’d want to call GC with an upper time limit, say 1 millisecond for each call, and I would be calling that 30 times per second.
GC fix #2: sometimes I want to clean garbage myself
Inefficiencies and unpredictability of GC cause people to do even more work than a normal, oldskool memory allocation. Why not provide an option to deal with deallocations manually? I.e. a keyword reallynew could allocate an object that is not part of garbage collected world. It would function as a regular .NET object, just it would be user’s responsibility to reallydelete it.
Mono is already extending .NET (see SIMD and continuations). Maybe it makes sense to add some way to bypass garbage collector?
#2: Distribution Size
Using C#/.NET in a game requires having .NET runtime. None of the interesting platforms are guaranteed to have it, and even on Windows you can’t count on it being present. Mono is great here in a sense that it can be used on many more platforms than Microsoft’s own .NET. It’s also great on distribution size, but only if you compare it to Microsoft’s .NET.
In Unity Web Player, we package Mono DLL + mscorlib assembly into something like 1.5 megabytes (after LZMA compression). Which is great compared to 20+ megabytes of .NET runtime, but not that great it you compare it so, say, Lua runtime (which is less than 100 kilobytes).
On some platforms (iPhone, Xbox 360, PS3, …) it’s not possible to generate code at runtime, so Mono’s JIT does not work. All code that’s written in C# has to be precompiled to machine code ahead of time (AOT compilation). This is not a problem per se, but because .NET framework was never designed with small size and few dependencies in mind, doing anything will ultimately pull in a lot of code.
We joke that doing anything in C# will result in an XML parser being included somewhere. This is not that far from the truth; e.g. calling float.ToString() will pull in whole internationalization system, which probably somewhere needs to read some global XML configuration file to figure out whether daylight savings time is active when Eastern European Brazilian Chinese calendar is used.
Size fix #1: custom core .NET libraries?
For game uses, most of “fat” stuff in .NET runtime is not really needed. float.ToString() could just always use period as a decimal separator. Core libraries could consist just of essential collections (list, array, hash table) and maybe a String class, with just essential methods. Maybe it’s worth sacrificing some of the generality of .NET if that could shave off a couple of megabytes from your iPhone game size?
Of course this is very much doable; “all that is needed” (tm) is writing custom mscorlib+friends, and telling C# compiler to not ever reference any of the “real” libraries.
Size fix #2: make Mono runtime smaller
Uncompressed Mono DLL in our Windows build is 1.5 megabytes. We have turned off all the easy stuff (profiler, debugger, logging, COM, AOT etc.). But probably some more could be stripped away. Do our games really need multiple AppDomains? Some fancy marshalling? I don’t know, it just feels that 1.5MB is a lot.
#3: Porting to New Platforms
You know this classic: “There’s no portable code. There’s only code that’s been ported.”
Most existing gaming platforms are quite weird. Most upcoming smartphone platforms also are quite weird, each in their own interesting way. Porting a large project like Mono is not easy, especially since parts of it (JIT or AOT engine) highly depend on the platform.
For Unity iPhone, unexpected discovery that it’s not possible to JIT on iPhone made the initial release be delayed by something like 4 months. It did not help that in early iPhone SDK builds JIT was actually possible, and Apple decided to disable runtime generated code later. Making Mono actually work there required significant work both from Mono team and from Unity. We still have one guy working almost exclusively on Mono+iPhone issues!
Of course, maybe all the Mono iPhone work made porting to new platforms easier as a byproduct. But so far we don’t have Mono ported to any other platform, up to production quality. So judging from experience, we now always assume Mono port will be a pain, just because “some nasty surprises will come up” (and they always do).
#4: Small Stuff
There is a ton of small bits where extending .NET would benefit gaming scenarios. For example:
Suppose there is some array on the native engine side; for example vertex positions in a mesh (3xFloat for each vertex). Is it possible to make that piece of memory be represented as a native struct array for .NET side? So that it would not involve any extra memory copies, but N vertices somewhere in memory would look just like Vector3[N] for C#?
On a similar note, having “strided arrays” would be useful. For example, mesh data is often interleaved, so for each vertex there is a position, normal, UVs and so on. It would be cool if in C# position array would still look like Vector3[N], but internally the distance between each element would be larger than 12 bytes required for Vector3.
Where do we go from here?
The above are just random ideas, and I’m not complaining about Mono. It is great! It’s just not perfect. Mono being open source is a very good thing, which means pretty much any interested party can improve it as needed. So rock on.

 Also, we stopped saying “Sales are INSANE!!!!11” whenever they exceeded a whopping ten thousand euros per week.
Seriously, that much money in 2006 was a big thing. Our Windows build machine was a single core Celeron with 512MB RAM because that’s what we could afford! Well ok, we’re still saying “sales are insane!” from time to time, just the threshold has gone way up.
Also, we stopped saying “Sales are INSANE!!!!11” whenever they exceeded a whopping ten thousand euros per week.
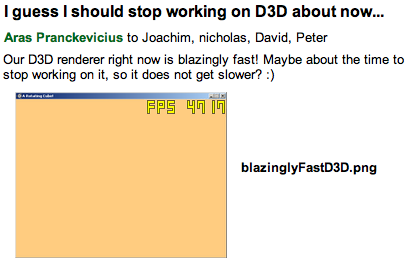
Seriously, that much money in 2006 was a big thing. Our Windows build machine was a single core Celeron with 512MB RAM because that’s what we could afford! Well ok, we’re still saying “sales are insane!” from time to time, just the threshold has gone way up. Occasionally we’d get excited about strangest things. I think this email is about some car model from ATI that was on front page of our website in 2006. It’s beyond me why we’d put a car on Unity website, but somehow it seemed to make sense at the time.